
The need for processing power, has led generally machine learning to run on desktop computer. However once trained, a model may be executed in a more constrained environment like the tiny computer chips in wearable medical devices, household appliances, and in general in the 250 billion other objects that constitute the “internet of things” (IoT).
So the ability to run deep learning models directly in the browser opens up interesting perspectives for different number of reasons.
Some are easy to imagine: working on the edge lowers the privacy concerns and, at the same time, it simplifies the management of all sensors and data accessible to the browser, without requiring installation. As result of this, user data can stay on device so to preserve user-privacy and at the same time enable applications tailored to personal domains as for example health, and medicine.
An example of this is the Federated Learning. In this approach ML training phase is based on devices that collaboratively train a centralized model while keeping sensitive data on device.
Machine Learning and Tensorflow.js
In this blog-post we are going to explore how it is possible to deploy a simple ML pre-trained model and make inference based on this, relying only on the web-browser functionalities. For this purpose we will use the library written in Javascript named Tensorflow.js, that is the companion library of Tensorflow in Python.
More specifically TensorFlow.js is a JavaScript library established as an open-source framework for training and using machine learning models in the browser. It supports JavaScript developers in building and deploying ML models within client-side applications.
Given the compatibility with Tensorflow, we can use Tensorflow.js both for creating new ML model and also for exploiting learning model already built in Tensorflow that we can easily convert to run in the browser. TensorFlow.js provides acceleration using WebGL standard that allows accelerated graphics computing in the browser ( If you do have a GPU or graphics card on that machine, WebGL would let you take advantage of that for accelerated computing).
As before underlined, the fact that TensorFlow.js runs over the browser, opens up a range of different possibilities for developers and stakeholders.
If we think of the browsers as interactive environment, that offer access to various sensors like webcams and microphones, it is natural to think that they can provide images and sounds as an input into any machine learning models.
Another key point of using Tensorflow.js is in the different environments in which JavaScript applications run: browser; on servers inside a Node.js environment; on the desktop; and last but not least in mobile browsers on Android and iOS devices.
As regards data privacy another benefit of leaving the training and inference data on the client is the protection of users’ privacy : for certain types of applications, data privacy is an absolute requirement i.e. Health information privacy regulations in many countries will not allow the images to be transferred to a centralized server for inference. For this reason, when running the model inference in the browser, no data needs to ever leave the user’s computer or be stored anywhere, so to assure the privacy of the user’s health data.
Privacy is not the only benefit of on-device machine learning. In some applications, the roundtrip of sending data from the device to server can cause a delay that will hamper the user experience. In other settings, users might want to be able to run their machine learning models even when they don’t have an internet connection. In these cases, having JavaScript machine learning models that run on the user’s device can come in very handy.
Transfer Learning Image Classifier with Tensorflow.js
The first step is to set up the Tensorflow.js environment. We can use a VSCode editor downloadable from here and open up a simple html page named myInf.html. To download Tensorflow.js in the browser we will use the script tag method. This method works because there is a copy of TensorFlow.js on the content delivery network and including the script tag in our html page will allow the browser to fetch the file referenced in it and then run that code, so that you have a copy of TensorFlow.js running on your current browser. Let therefore connect to here and copy and paste in the myInf.html file the following line
<script src="https://cdn.jsdelivr.net/npm/@tensorflow/tfjs/dist/tf.min.js"></script>
After this, it is turn to load the pre-trained model for image recognition directly from the github of MobileNet via this link here so copy and paste the following tag
<script src="https://cdn.jsdelivr.net/npm/@tensorflow-models/mobilenet@1.0.0"> </script>
After inserting this tag, it is now turn, to incorporate the pre trained model for image classification
<script>
  const img = document.getElementById('img');

    // Load the model.
    mobilenet.load().then(model => {
      // Classify the image.
      model.classify(img).then(predictions => {
        console.log('Predictions: ');
        console.log(predictions);
      });
    });
</script>
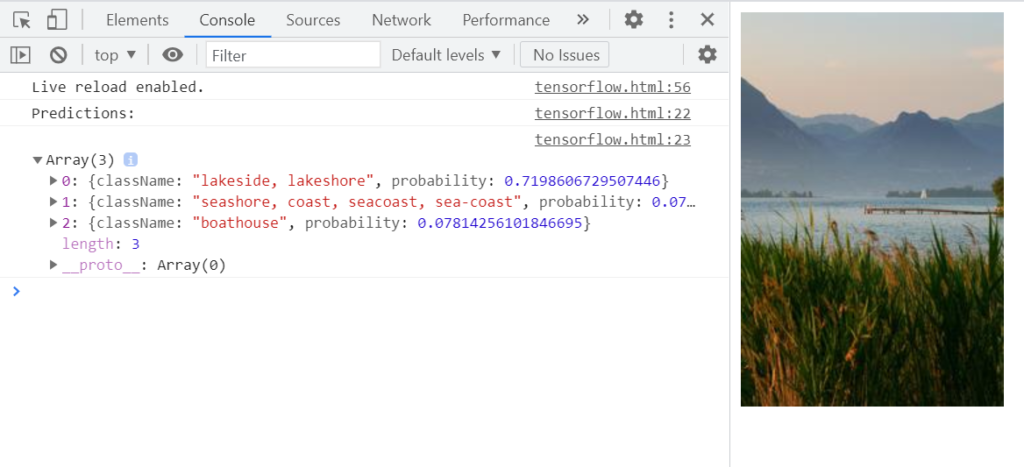
The last step also comprises the reference to the image we will use to make our inference and guess the label. In this case it is a landscape image retrieved from internet.
<img id="img" src="https://i.picsum.photos/id/128/200/300.jpg?hmac=7to6-3CeagytIcDSNoyBUAgdzKPBMw3CYRpVrm7DBSA" crossorigin="anonymous"/>
So just to summarize we have the overall myRef.html, with a very basic html structure as follows:
<!DOCTYPE html>
<html>
<head>

</head>
<body>

  <script src="https://cdn.jsdelivr.net/npm/@tensorflow/tfjs/dist/tf.min.js"> </script>

  <script src="https://cdn.jsdelivr.net/npm/@tensorflow-models/mobilenet@1.0.0"> </script>

  <img id="img" src="https://i.picsum.photos/id/128/200/300.jpg?hmac=7to6-3CeagytIcDSNoyBUAgdzKPBMw3CYRpVrm7DBSA" crossorigin="anonymous"/>

  <script>

    const img = document.getElementById('img');

      // Load the model.
      mobilenet.load().then(model => {
        // Classify the image.
        model.classify(img).then(predictions => {
          console.log('Predictions: ');
          console.log(predictions);
        });
      });
    </script>

</body>
</html>
To get our prediction we have to launch a local developement server. In this case we need to have Node.js and then install a Node package which provides a simple http webserver. We can do in another simple way downloading an extension for vscode in this repo that once installed will allow us to launch the inference in the browser: simply right click on the myInf.html and select the option Open With Live Server.
To verify the result it is important to access the developer tools on chrome and in the console you can varify that the random image was identified.
Main Take away
This result shows that although using less computation power, web browser machine learning, compared to the native applications can indeed make the cross-platform portability issues much simpler.